I finally got my hands on an Intel iMac 27″ 2020 and wanted to see if I could also replace my old gaming rig and install Windows. As the internal SSD is only 512GB, I didn’t want to install on the internal drive. After some reading in addition to trial and error, I finally got a great dual boot setup with an external SSD for Windows. Read on and I’ll guide you through the whole process. No purchases (except Windows License) is necessary!
This guide assumes you have an Intel Mac and basic knowledge of Mac and Windows, but everyone should be able to run through this tutorial and get a functional dual boot by following this guide, but it is slightly more difficult than using Boot Camp natively.
Note: Even though we’re not going to use the original “Windows To Go” creation utility (which is abandoned by Microsoft), this will still use the Windows To Go feature on Windows, which is still there. This means that there are certain limitations, for one; not being able to update to the next “anniversary update”. You will get updates, but major updates can not be applied. This approach is still new to me, so I’ll update with how to avoid the update nagging when the next (2104) update is available.
I’m basing this guide on being a 100% Mac owner, not being able to create a Windows USB drive from an existing Windows computer.
We’ll start by downloading VMware Fusion. Don’t worry, we’re not going to virtualize Windows, we only need it to initiate the external drive we’re installing to.
Follow this link, and just click “Download Now” under “Fusion 12 Pro for macOS”. You don’t need to register. Install it on your Mac. Choose “I want to try VMware Fusion for 30 days”. I also had to enable VMware Fusion under “Accessibility” settings and “Full Disk Access” in the “Security & Privacy” tab.

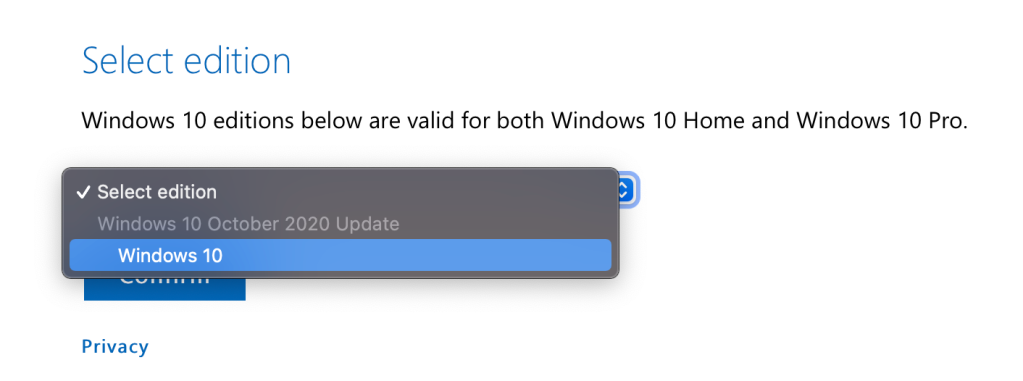
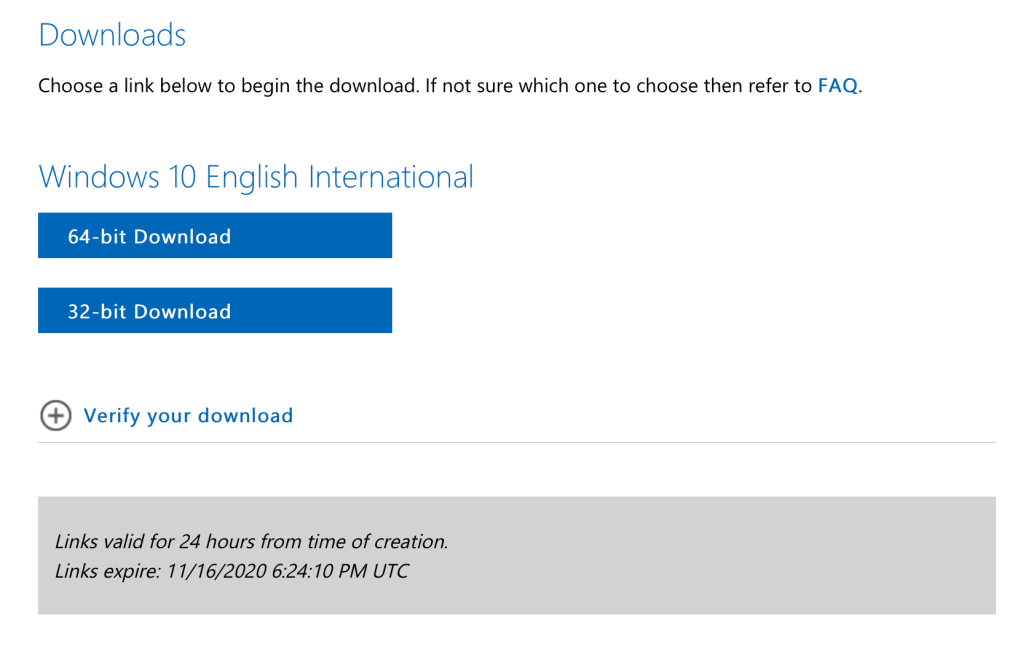
You also need to download the Windows 10 you want. A free test-period is available for Windows 10. Choose version and language, and then 64-bit.

You could probably also download a free virtual development install for VMware or any other virtualization host, but I haven’t tested this yet.
Depending on your Internet connection, this could take anywhere from a couple of minutes to several hours. When the ISO is downloaded, start VMware Fusion. Just drag your ISO to the installer and follow these settings for an automated install. Don’t worry too much about this, as we’re going to dispose of this install after setup. It’s just to prepare our external Windows drive. It should be fairly quick to install and boot.
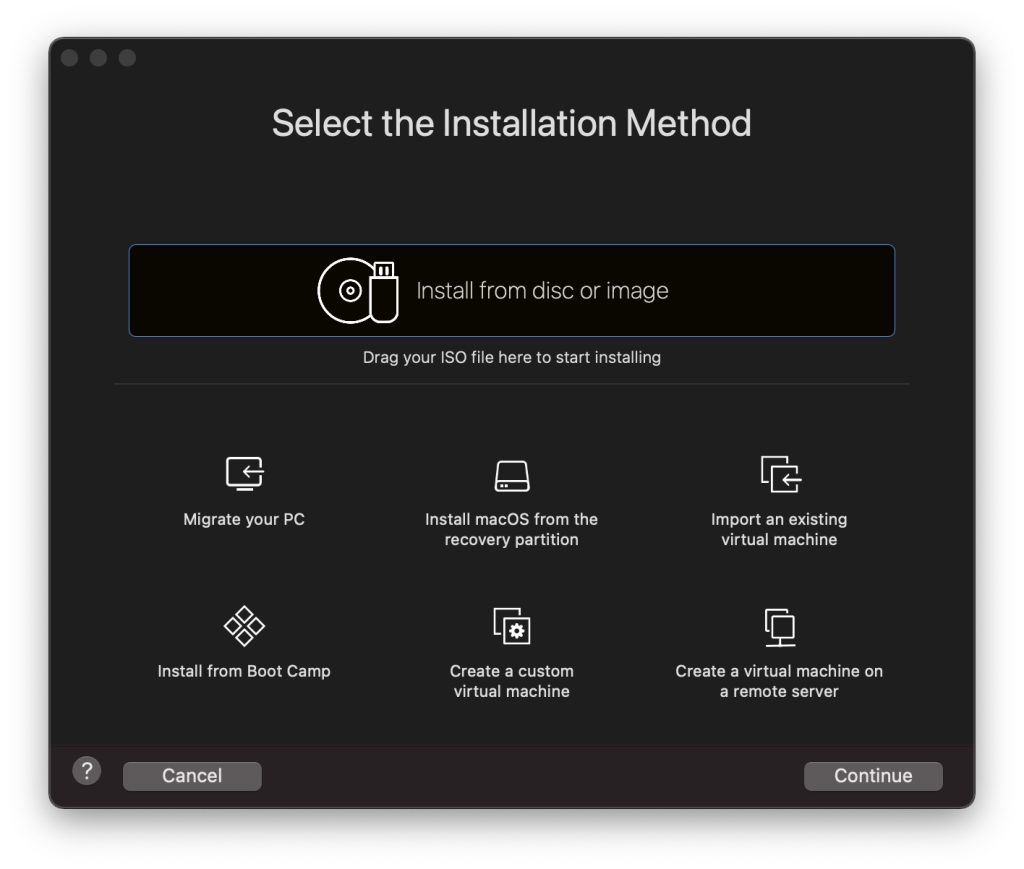
Drag your ISO to the bar 
Click Continue 
Choose “Use Easy Install” and a Windows version, it doesn’t really matter too much. 
We’re only using this Windows for a short while, continue without adding a key. 
Keep this version isolated for simplicity. 
Check that your settings are somewhat similar to this, and click Finish 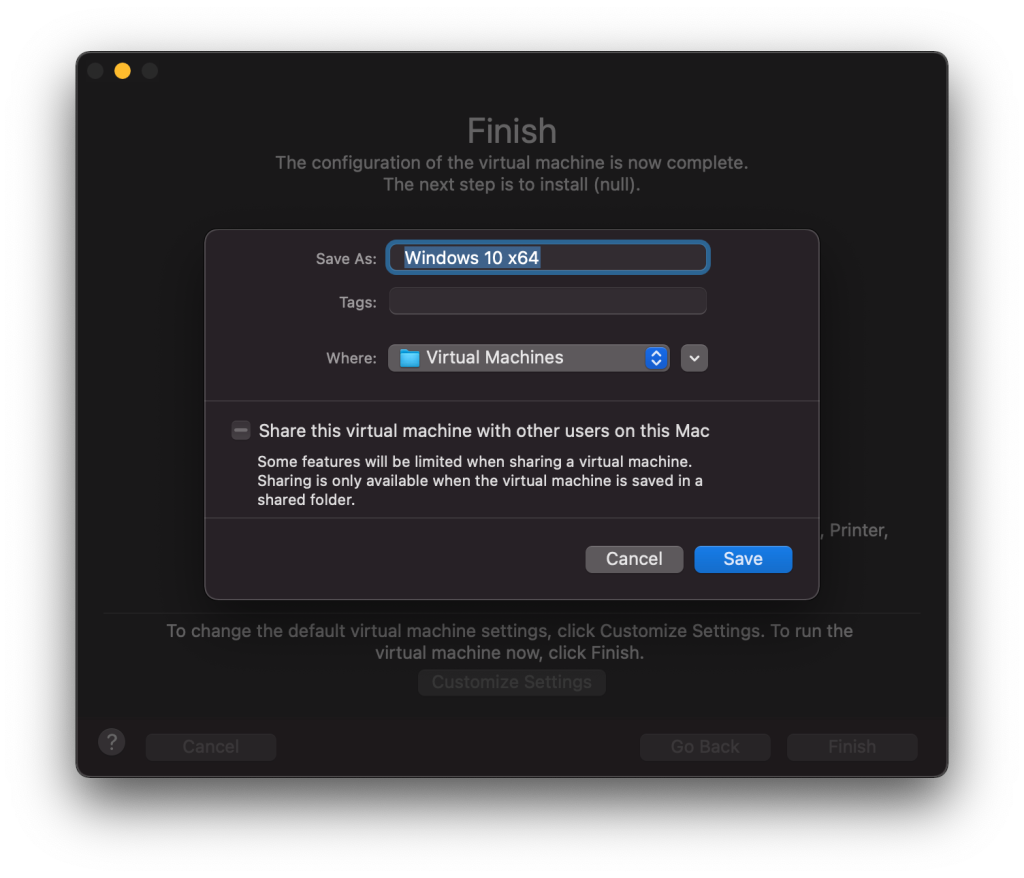
Just keep the default for simplicity, or change it if you have to.
Meanwhile we can start preparing the USB drive. Using Disk Utility, format the external drive to MS-DOS (FAT) and give it a recognizable name. We will reformat it later, but it’s just to make things simpler.
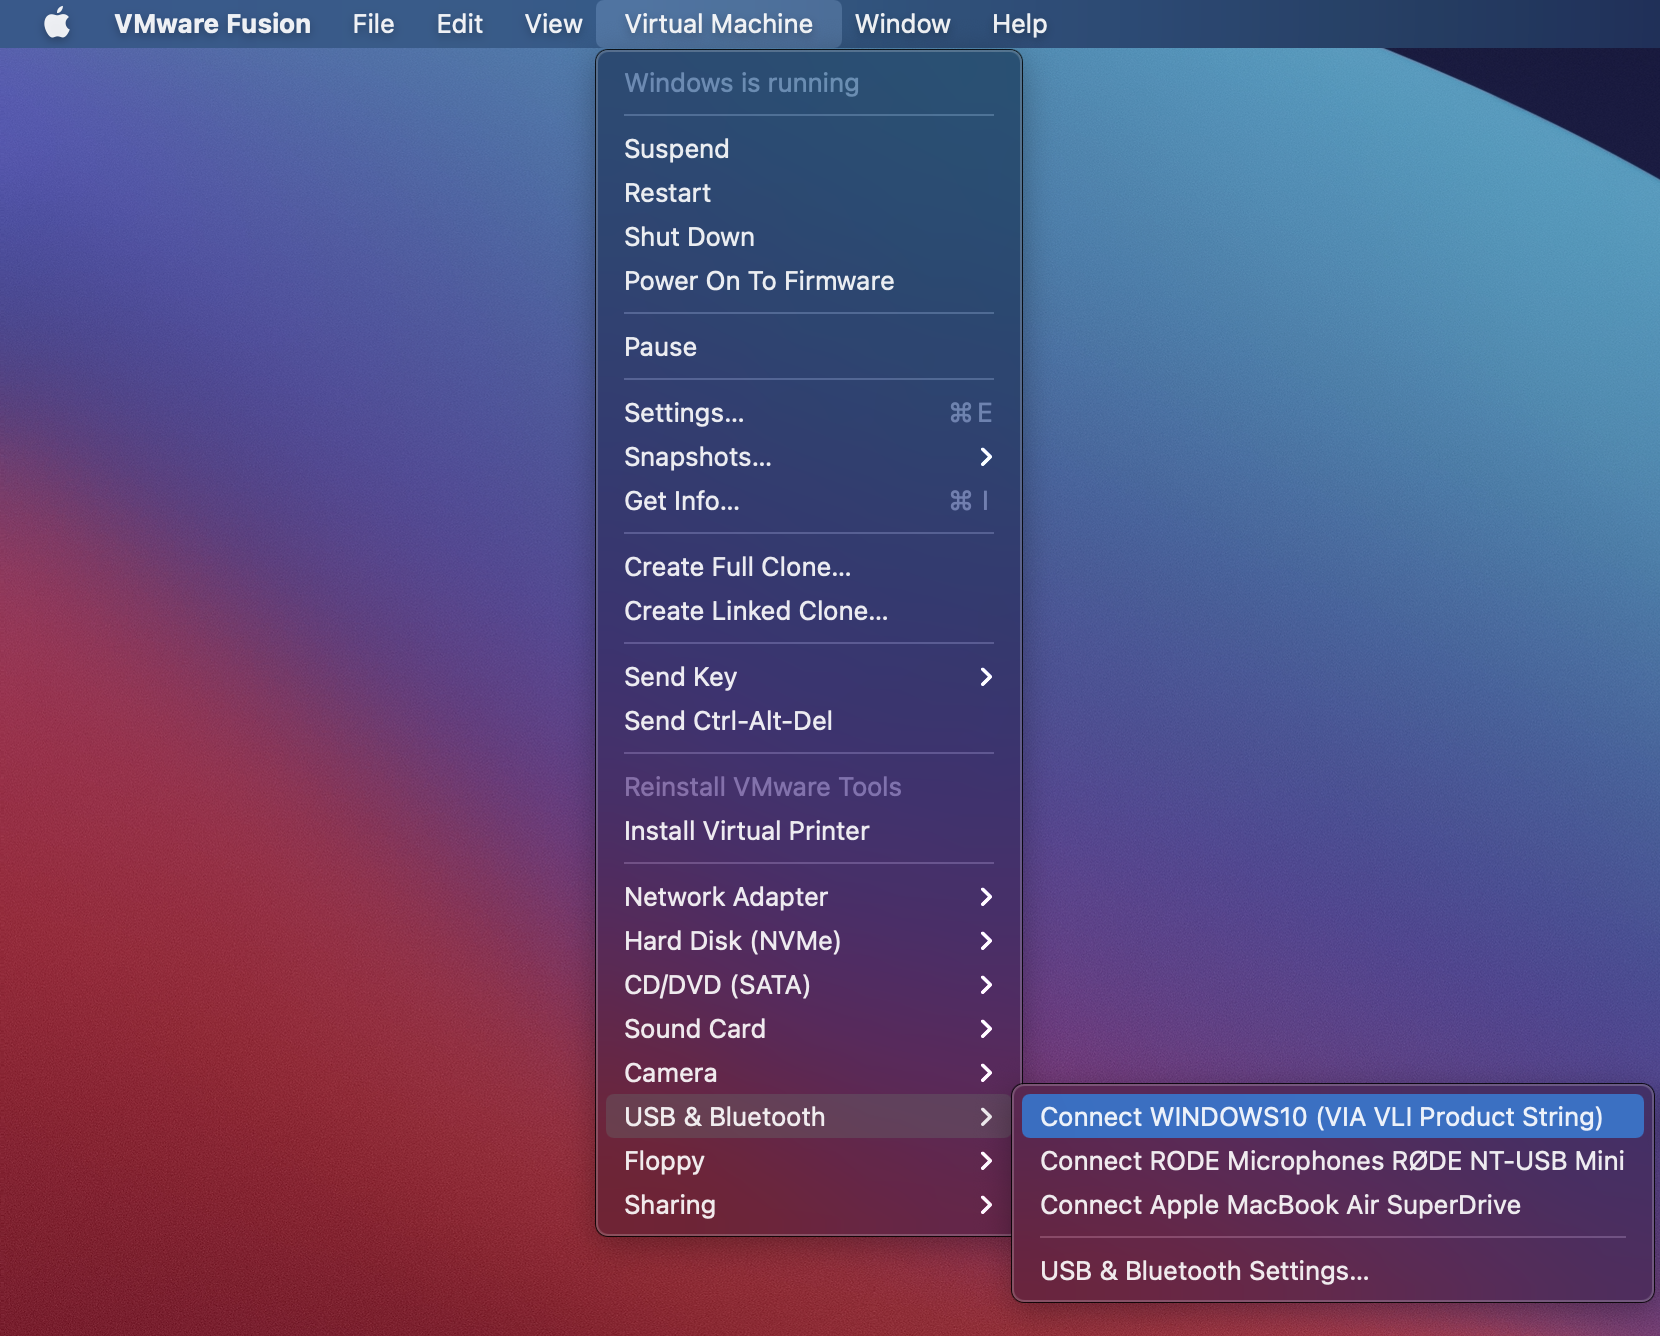
When booted, click “Virtual Machine” at the menu bar, then “USB & Bluetooth” and choose your drive. It will now be disconnected from macOS and connected to the virtual Windows installation.
Drag and drop the Windows ISO to the virtual Windows computer’s desktop.
Further, you can either download and copy files from your Mac desktop, or you can use the virtual Windows installation to download directly via Edge. In any case, get Rufus from Rufus.ie. I prefer “Portable” just because it’s simpler. Download and open.
Click “Show advanced drive properties” and choose “List USB Hard Drives”. Assuming you haven’t added more USB-devices to this virtual machine, it should now be listed under “Device” at the top. Make sure it is correct!

Click “SELECT” and choose your ISO. Then under “Image Option” choose “Windows To Go”. I changed my volume label to Windows10. I left the other settings as is. Click start, choose your Windows 10 version, then “OK”. You’ll be warned with all data being deleted on the connected USB-drive, continue at your own risk.
Assuming you’ve followed all the steps in my guide so far, you should now be very close to getting an external Windows SSD (or HDD if you rather went with that). Let Rufus apply the Windows Image, and sit back, watch YouTube/Netflix or whatever because it can take some time.

When done without any errors, open File Explorer (still in Windows) and browse to the root of the USB drive.
Then on your Mac, start Boot Camp Assistant, we need it to download some drivers. When it’s opened, go straight to the menu bar at the top and click “Action” and select “Download Windows Support Software”. Download it to your Desktop or Downloads or whatever. You should end up with a “WindowsSupport” folder in a few minutes. Then just close the Boot Camp Assistant, we don’t need it for anything else.
Drag and drop the “WindowsSupport” folder to the root of the USB-drive, and shutdown the virtual machine, we’re done with VMware Fusion.
Now over to the “scary” part. This is necessary to be able to boot from any USB device on Windows, and AFAIK anything else than macOS while not using the integrated Boot Camp support (which can only use the internal drive). Reboot your Mac and hold command+R to get you in to “Recovery Mode”. Click “Utilities” at the top, and “Startup Security Utility”. Set “Secure Boot” to “No Security” and “Allowed Boot Media” to “Allow booting from external or removable media”.
This is only for the boot security and shouldn’t affect any security for your computer while booted. Although I’m not a fan of disabling security features, this is 100% necessary to be able to boot from an external drive. I unfortunately don’t have screens for this part, but it is fairly simple to do.
After you’ve done this, reboot while holding option on your keyboard, and choose your new “EFI Boot” drive, to start Windows configuration on your new drive.

There are some steps to get the drivers all working, but I’ll guide you through. Your internal keyboard will probably not work during this process. Any external Apple keyboard might work if plugged in with Lightning Cable. Otherwise, use any USB keyboard/mouse for now, until drivers are in. Please do follow further closely to make sure all drivers are in for a fully supported Windows installation. I’m on an iMac with Apple Magic Keyboard 2 and Magic Trackpad 2, so some steps might be different for you.
Start by going through the setup wizard for Windows. This is your final installation, so do set it up to your preferences. When you’re done, don’t worry about any devices not working etc, we do have some things to fix, and it is important that you follow these steps to make sure it works as intended. Due to Windows being on an external drive, and possibly encrypted, system restore doesn’t always work properly, and you will have to reinstall if something gets messed up.
Start by opening the C: drive, WindowsSupport and run Setup.exe under “BootCamp”

Let it run through. It will take some time, and it will reboot your computer. Make sure it reboots to Windows.
Open Apple Software Update from your Start Menu, and update to the latest Boot Camp version.

You will most likely notice that you’re still missing some features/devices, most notably audio. Don’t worry, there are some issues with this way of installing, but I can assure you it will work. I’ve gone through trial and error so you hopefully won’t.
Right-click start menu, and open Device Manager. This is where you’ll see some problems. Don’t go blindly and fix these issues, but follow my guide.

You’ll see some devices with issues, notably “Mass Storage Device” at the top (sorry for my Norwegian screenshots). Right click and choose update driver. For these next steps you want to choose manual installation, and choose where to install from. You want it to search through C:\WindowsSupport including subfolders.

After a short while, it should find the correct driver without any warnings, and you should be greeted with the proper name for this device:

One down, let’s continue with the next one from the top. Probably “PCI-device” or similar. Do the same as above, searching on the computer from C:\WindowsSupport including subfolders, it should be stored for your convenience. You should see the next device be installed.

I believe you’ll see some weird things happen with the Apple USB controller, as you’ll probably see the screen dim etc. It just means that the Apple hardware is now being properly recognized by Windows, giving you the same features as in macOS. Don’t worry about it yet, but keep installing the devices. I believe bluetooth etc. should also start working (if you have external Magic Mouse and Magic Keyboard). But don’t worry about that yet.

If you were like me and had three devices at the top (I’m on a 2020 iMac 27), these are the ones you should now have fully installed. But you might also have some other devices further down the list (ignore audio for now).
For me at least, I have a triangle on the Broadcom wifi adapter, so I do the same procedure here.
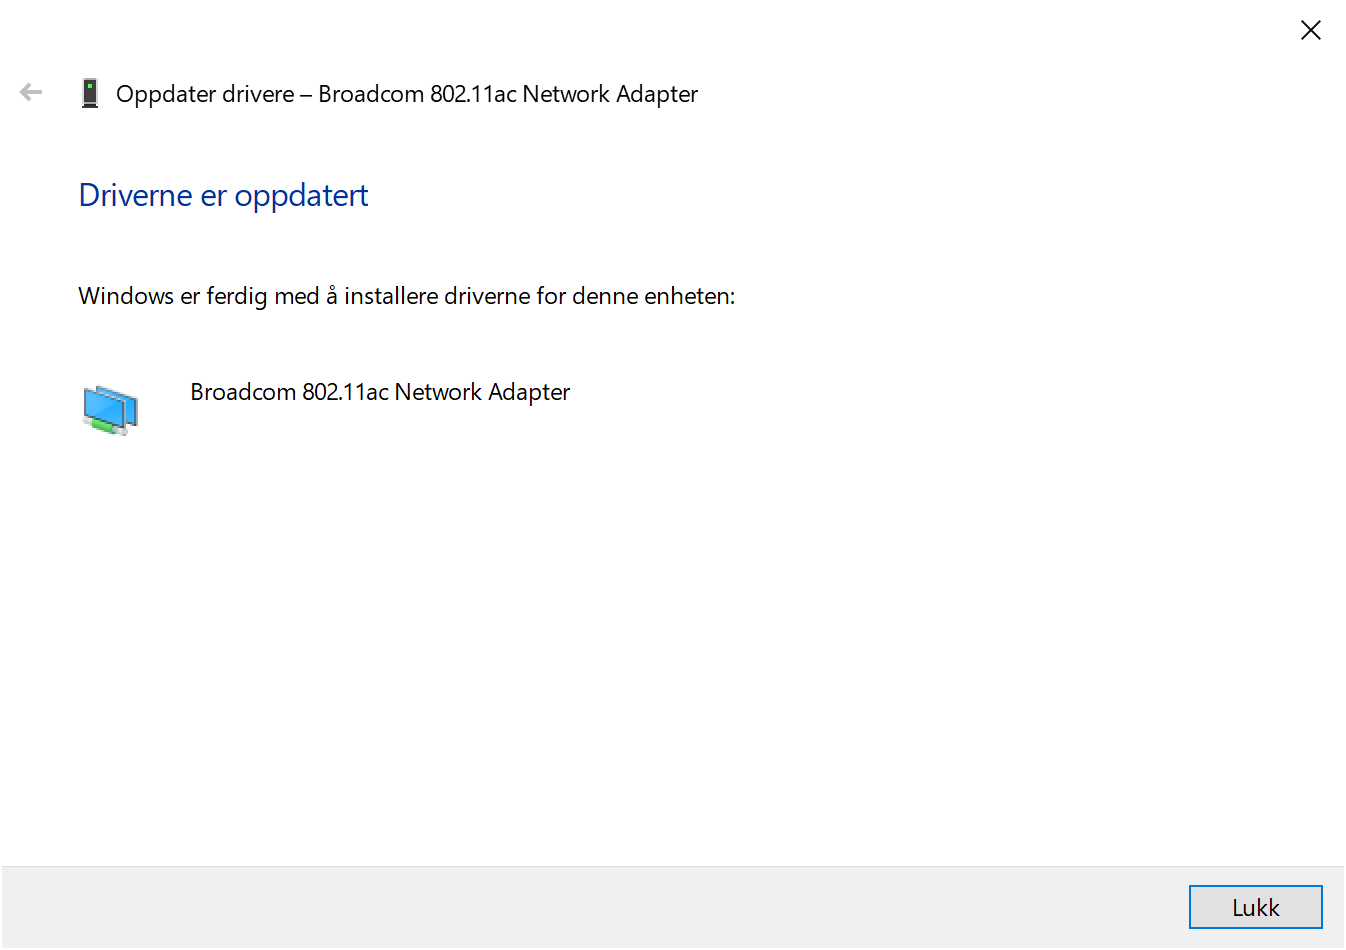
For me that concludes updating drivers with a triangle on them. Please do still ignore Audio not working, as it is not the device itself that has the issue, but the Apple USB controller we installed earlier on. It should be fixed after a reboot:

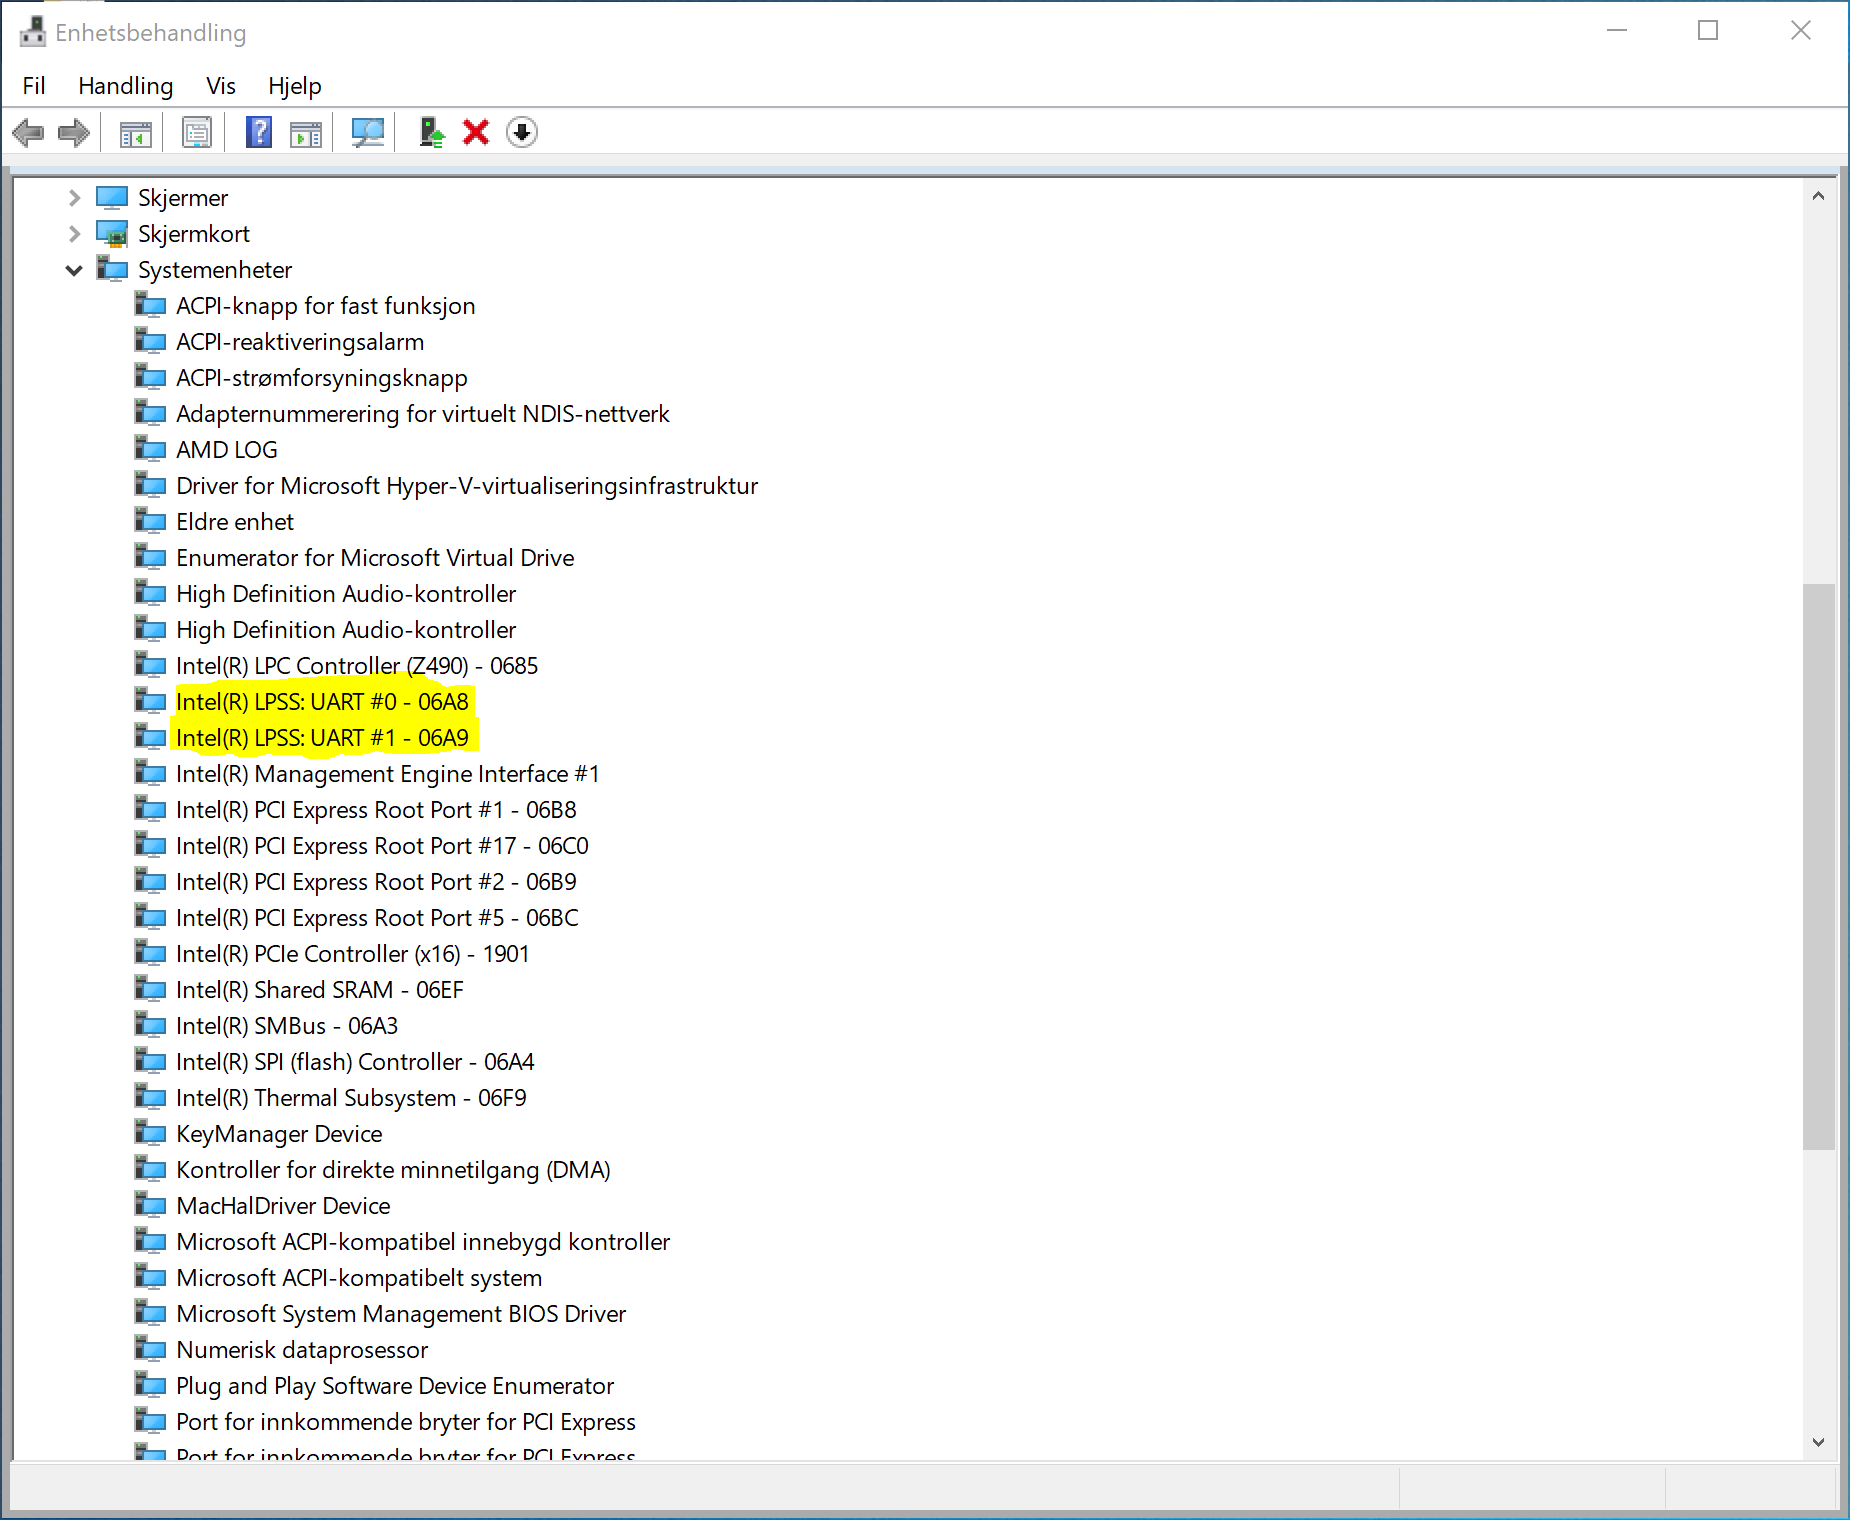
The next issue I had, which did take me a while to fix, was trackpad and keyboard.
Locate these two devices under “System Devices”. This is your mouse and keyboard, but they are using the wrong drivers. Simply do the same as above, search for drivers under C:\WindowsSupport :
They should be updated to new devices:

If you now right click the BootCamp manager by your system bar, and open its control panel, you should see Keyboard and Trackpad setting tabs. If you like me don’t have the trackpad tab, you need to fix another issue. This did take me a while to get corrected. Under Human Interface Devices, you should see the Apple Keyboard if installed correctly, and “Bluetooth HID-device”. This would be your trackpad. Ignore the rest, some actually belongs to the keyboard/trackpad:

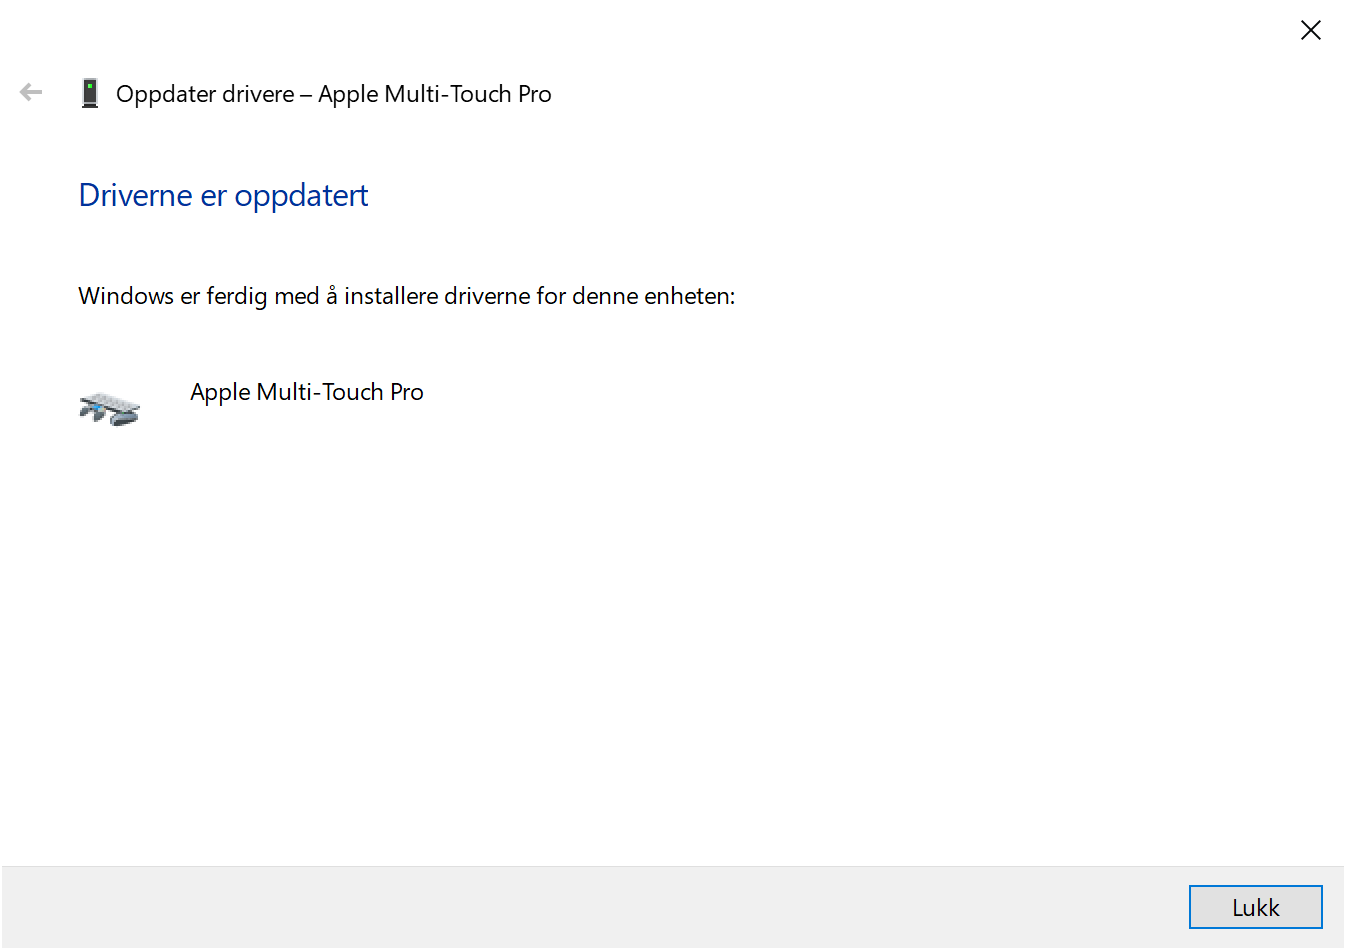
Right-click it and search for drivers in the same way as before. If everything goes as it should, it should find the correct trackpad driver. Do NOT force in any unsupported drivers by using “Have disk”, as that usually does make a mess.
For me at least, it did find a driver called “Apple Multi-Touch Pro”.
While I can’t verify that this is in fact the correct driver, it seems to work as it should, I noticed a difference immediately as the trackpad now doesn’t feel too fast/jerky anymore. I could also find the trackpad tab under the boot camp control panel, and configure it to my liking. The sensitivity needs to be changed by the Windows Mouse device settings.

This concludes my configuration of the Windows installation. Everything seems to work as intended. Fun fact: When activating Windows 10, I used an old Windows 7 license I used on an old machine which is now trashed, it happily accepted the license and gave me a free digital license for Windows 10. If I ever reinstall on this Mac, it will automatically activate the license based on hardware.
The only thing I haven’t got working is enabling “natural scrolling” like the default in macOS. This is because Windows only supports that for certain trackpads, while Magic Trackpad 2 is recognized as a standard mouse. I don’t worry too much, as I’m using macOS as my primary OS, but Windows 10 for gaming, where I have a separate gaming mouse anyways.
You can now choose “boot to macOS” by right-clicking the BootCamp manager, or simply hold “Option” while rebooting.
Under settings on macOS, you can choose the default OS to boot from. Note that this is not a “Boot to Windows” option, it only changes what is default. I changed mine to macOS after finishing this guide, and hold “Option” when rebooting whenever I’m going to play games in Windows 10.

Leave a comment if this post helped you, or you stumbled onto any issues, I might be able to help you out.
If you now got everything working as you want, you could continue with my next post, making the the icons and labels in the boot loader look nicer, but these changes are purely cosmetic and therefore optional.


Great guide, thanks!
Glad I could help👍